Showing posts with label tutorial. Show all posts

Wednesday, October 23, 2013

"Beauty": Reverse Canvas Step-by-Step for PaperHaus!

Good morning and welcome back!

Today I have a reverse canvas tutorial that I created for the PaperHaus Magazine blog. I hope you enjoy!

"Beauty"
You will need a stretched canvas for this project, of any size. Simply flip it over to the back side and let's begin!


Product List:
Patterned Papers: Prima Marketing
Flowers: Prima Marketing
Embellishments: Prima Marketing
Letter Stickers: Prima Marketing
Chipboard: Blue Fern Studios
Masks: Prima Marketing
Stamps: Prima Marketing
Mediums: Modeling Paste (Golden); Gesso (ProArt); Watercolors (Luminarte); Acrylic Paint (Apple Barrel); Mist (Shimmerz); Chalk Ink (Prima Marketing); Distress Ink (Tim Holtz)
Other: masking tape, pearls, cardboard, book pages
 

Thank-you for stopping by today! Take care of yourselves :)

Sunday, August 11, 2013

PaperHaus: Layered Tag Tutorial

Good morning!

The weekend is just beginning in my part of the world, and it's the time of year that is very busy for me. It's berry season- blueberries right now and raspberries shortly to come. That means hours spent picking, cleaning, sorting, baking, canning, and freezing. And I LOVE it. It's also time for the garden to be harvested. The peas are ready, the tomatoes will be turning any day which means homemade spaghetti sauce, salsa, and canned tomatoes for chili this winter. Hunting season is on its way, as is apple harvest time- which means more and more canning. Love it. 

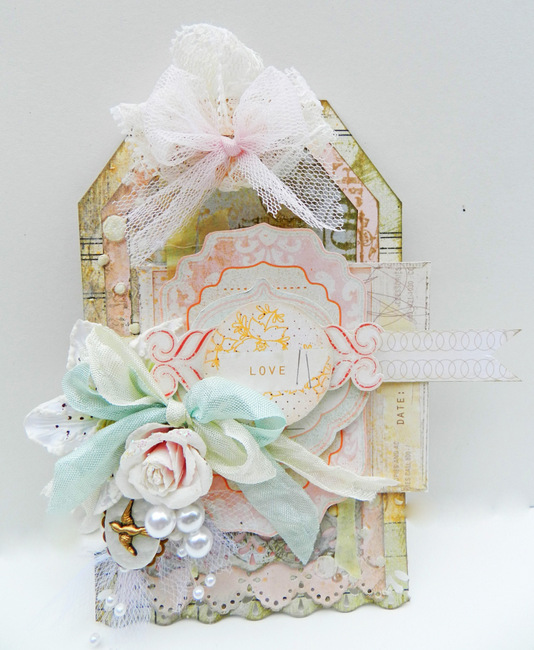
So before I venture off into berry picking land today, I want to share with you a layered tag tutorial that I put together for PaperHaus. I hope you enjoy :)

"Love" Shabby Layered Tag
A lot of people like to know how I go about assembling my tags. I do follow a pretty basic structure, so let me walk you through my step-by-step:


Product List:
Patterned Papers: Prima Marketing
Flowers: Prima Marketing
Embellishments: Jolee's
Mask: Heidi Swapp
Stamps: 7 Gypsies
Mist: Tattered Angels
Modeling Paste: Golden
Border Punches: Martha Stewart
Other: trims, tulle, pearls

Thank-you for coming by! Have a great weekend :)

Wednesday, August 7, 2013

Prima Marketing: "Wonderful Bond" {Step-by-Step Tutorial}

Hi everyone! I hope you're having a great week so far :). I spent the day picking wild blueberries and got myself a whole gallon so I'm excited to make some more blueberry pies and maybe even do some jam! But I'm exhausted- so finally sitting down to get this post typed up and shared with you all :).

I have a step-by-step tutorial of a layout that I created for Prima. It has been broken down into 7 easy steps, and I hope you enjoy!

Here is what we will be creating today:

"Wonderful Bond"
This photo of Wyatt and Aspen just melts my heart :). Precious moments!

Here are the steps I took in putting this layout together:


Products Used:
950699- Delight Collection "Destinations"
950729- Delight Collection "Delicate"
950750- Delight Collection "Discover"
845506- Lifetime Collection "Familia"
845476 - Lifetime Collection "Blue Bayou"
961015- Finnabair Clear Stamps
960780- Finnabair Clear Stamps
960803- Finnabair Clear Stamps
960490 - 12x12 Stencil: Vanishing Circles
570514- Cling Stamps
570385- Say it in Crystals Swirl- Multi
570262- Say it in Crystals Arrow- Multi
569877- Wood Icons in a Box- Gears
570620- Pebbles
569969- Resin- Clocks
563264 - Tiny Alphabet Stickers- Divine
563288 - Tiny Alphabet Stickers- Lyric
571115- La Tela- Woodsy Floral
571153- La Tela- Romantic Lace
571757- Abbey
571825 - Abbey
571399- Scarlett
571504- Le Mia- Cashmere Flower
571559- Le Mia- Lagoon Flower
570668- Anna Marie- Flowers

I love ALL of the new wood icons from Prima- these gears are some of my favorites :) Most of these I've cut in half and stuck into my clusters- always looking for ways to stretch product, right?!

There are LOTS of great new Say it in Crystals varieties!


Thank-you so much for coming over and checking out my little tutorial :). These step-by-steps will be a regular at the Prima blog this month, so don't miss out! 

See you soon- take good care of yourselves :)

Saturday, July 27, 2013

Something a Little Different for Blue Fern Studios {Tutorial}

Hi everyone! This is another prescheduled post as I'm assuming I will be quite tired after arriving home last night that I won't be up for creating a blog post, lol. But I'm sure I will be updating you shortly with news about my CHA trip and photos too!

Today I'm sharing with you one of my projects for Blue Fern Studios. I created 3 projects for them this month and will be sharing them over the course of the next week. The end of the month is always my busiest time- so beware...lots of work to be shared in the coming days!

The one I am showing you today is a project of a different kind. When setting about creating this, I only wanted to do something "different". Meaning, I didn't want to do a layout, card, or tag...I really wasn't sure what I wanted to do...just something different. I have a shelf where I keep things like blank chipboard albums or other mini albums waiting to be created, alterable stuff...things like that. As I'm going through the shelf, nothing is appealing to me. I wanted to do something artsy...but I'd done several canvases over the week before and just didn't feel like doing another canvas.

BUT, I did want to do something that had texture like a canvas. And that is how I settled on creating something with sandpaper. 

Yeah, weird I know! But I thought...hmm, I wonder how this will take? So I set about my project like this...I have a step-by-step for you if you'd like to play along ;)

"Pretty Creative Girl This Afternoon"
I love this photo of my daughter that I took recently. She spent nearly an hour painting and she was just the CUTEST little thing! So serious at times, dipping her brush in the water and then mixing it in with the paint...making a mess, experimenting. Way too cute. I guess we both felt like being a little creative lately ;)

Here are the steps:


Products Used:

Quatrefoil Garden Panel

Ironwork Accents


Other Products Used:

Ingvild Bolme Chalk Edger- Pastel Peach
Ingvild Bolme Chalk Edger- Pastel Pink


Thanks for taking the time to come over today! I hope you enjoyed my little tutorial...and perhaps inspired you to think outside the box too? 

Have a wonderful day...and stay in touch, I've got much much more to share!

Sunday, July 14, 2013

Accordion Album Tutorial for PaperHaus!

Hello :). I hope you've all had a great weekend! We were busy all day Saturday with Gunner's 3rd birthday party and I'm pretty tired- but it was lots of fun, pretty stress-free, but always leaving me a tiny bit sad that the day is over and that my little guy is growing up. Okay, so more than a "tiny bit sad"...it's a feeling I stuff away so it doesn't affect the day- but after the kids are in bed and I'm alone with my thoughts, the realization of how quickly the past three years has gone simply terrifies me.

 But before I get any heavier here, let's move on to a project that I created for another amazing 3-year old; Gunner's cousin Lilah who was born exactly 4 weeks before him :). I made an accordion album for the PaperHaus magazine blog, and I've got some step-by-steps on how you can put one together too!

So let's begin :)

"Lilah Accordion Album"
 
I had a long piece of cardboard that I'd been hanging on to for just this sort of project. 

 **The dimensions of my album are: 21.5" long and 4.75" tall**


Here are some detailed closeups too!


Product List:

Patterned Papers: Prima Marketing "Divine" Collection
Flowers: Prima Marketing
Mask: Heidi Swapp
Mists: Tattered Angels
Embellishments: Basic Grey, Pink Paislee, Prima Marketing
Other: seam binding, pearl/tulle sprays, embossing powder, staples, watercolor paints
 
 So happy you came over for a look today! 
Enjoy the rest of your weekend (if it isn't already over) and take good care of yourselves :)
See you soon,