Showing posts with label seed beads. Show all posts

Friday, March 13, 2015

Let's Catch Up!

Hey everyone! Long time, no see. I know. 

Lots and lots going on in my world...always. That never changes. I've lately withdrawn from social media for various reasons and also from blogging. As many of you know, I also have a homesteading blog where I share a lot of our real life home practices which includes a from-scratch lifestyle, raising a variety of animals for different purposes, and striving to maintain simplicity- all the while raising 3 young kids and being a "stay at home mom" who works multiple part-time jobs both inside and outside of the home. So I've realized the need to disconnect a bit more from my online life and focus more of my available energy toward the everyday demands of my actual life. Get what I mean?

So in an effort to maintain that balance, blogging has become rather secondary. I didn't mean to take this big of a break and I apologize. And I wanted to take the opportunity today to catch up on some Prima projects that I've done in the past couple months. I hope you enjoy :)

"Hello" Tag
This tag was created using my favorite of the new releases from Prima, the "Butterfly" Collection designed by Jodie Lee. To say I love this range would be an understatement.The patterns, images, and color palette are a dream come true. I'm really into purple at the moment, so this one is right up my alley.

I've paired the papers with flowers new and old, as well as some gorgeous embellishments. The frame seen here is from the new "Timeless Memories" trinkets packs.


"Fall in Love" Card
Another new release from Prima is Frank Garcia's "The Archivist" collection. In Frank's true style, you will find lots of neutral colors and awesome patterns. This is one of those collections that you just have to have as it is so versatile. 

I've used one of the new Prima Mixed Media stamps here to create the messy butterfly background. And the brown egg carton flowers are amazing- they are super thick and durable which makes them perfect for mixed media!


"Love is Beauty" Tag
The "Bella Rouge" collection is bold and gorgeous. I've paired the papers here with new flowers and new Finnabair Art Ingredients. Microbeads, glass beads, and new Color Bloom sprays add to the textured mixed media background here.

"Happy Moment" Tag
 Another project featuring the "Butterfly" collection. A bit of fussy cutting here brought this tag to life :).

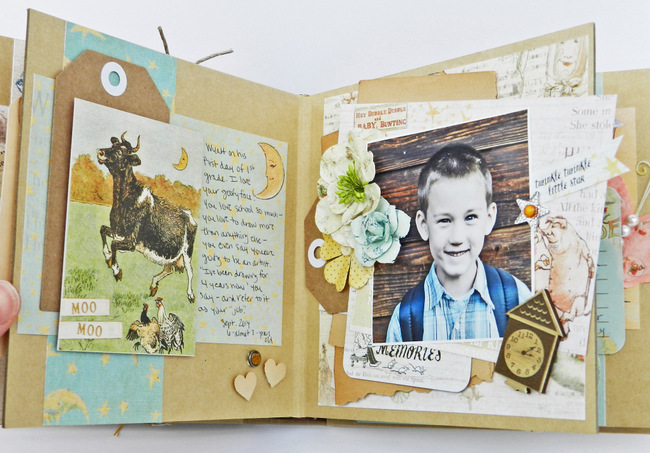
Bedtime Story Mini Album
If you've got little kids, you've got to have the "Bedtime Story" collection! The vintage children's book theme offers diversity and so much interest to an album like this one. 

Lots of new flowers, brads, wood icons, crystals, and other embellishments helped me out along the way.


There you have it, folks! I hope I didn't overwhelm you too much- I know there's a lot of images in this post today. :)

And as the week enters the weekend, I hope life is treating you well. We've had some unusually nice weather around here- a week ago it was -20 F and now we're in the 40's. Although we have several feet of snow yet and March typically shows us our biggest snow storms, it's a welcome break from our always-too-long winter. I'm starting my seeds inside this weekend and have been anxiously planning for our biggest garden yet with so many dreams and plans to be fulfilled.

I wish you all the best. And I hope to see you soon!

xErin

Monday, September 16, 2013

Prima "Pin Spin"

Good morning! Today I have a fun project to share with you that I created for the Prima "Pin Spin" day. What we do here is find a pin on Pinterest and draw inspiration from it. Being a lover of Pinterest, this one was no problem whatsoever ;). I have a "Pretty Things that Inspire" board where I pin photos of varoius things that I feel might come in handy if ever I'm in a creative rut. So I headed right for that board and was inspired to create this canvas for my daughter :)

"You're Cute"

Here is my inspiration photo from Pinterest:

I was just completely inspired by this GORGEOUS color palette! Brights mixed with pastels- I couldn't think of a better combo. And the balloons encouraged me to add that "something extra" to this canvas that I might not normally do. Just a great all-around jumpstart for me.


 I couldn't resist this title. I swear, I say "You're CUTE!" about a thousand times a day in an obnoxious baby voice LOL! Perfect- and I can hear myself saying it when I see this canvas. A great way to capture a memory :).

The balloons were created from cardboard and covered with gesso; masked with modeling paste, watercolors and beads on top. Just hand-cut pieces- no need to be perfect :)

Products Used:
960445- 12x12 Stencil: Orbs
960469- 12x12 Stencil: Stars
960476- 12x12 Stencil: Cubes
564223- 6x6 Stencil: Chevron
563264- Tiny Alphabet Stickers- Divine
569860- Wood Icons in a Box- Flower/LV
570613- Pebbles
571429- Layla
566609- Avante Coral
542634- Petunia Nocturne
565381- Hello Pastel Roses
565404- Hello Pastel Daisies
565947- Mini Sachet- Lakeside
565978- Mini Sachet- Pansy
565886- Labelle Harbor
561451- Serenade Pink
561352- Encore Turquoise

Thank-you for coming by and checking out my post today :). I hope your week is off to a great start! Take care,

Wednesday, August 28, 2013

Two More for Blue Fern Studios

Hello :) I'm back again today with my other two projects for Blue Fern Studios, so let's get started!

"Natural Beauty"
Many of you probably recognize this gorgeous little girl as my sister's daughter Lilah. She truly is a natural beauty- lucky thing! :) This layout was inspired by the photo and title piece and I went from there.

Wanting to keep the chipboard at least partially raw, I went for a brown and pink color scheme, which I love. My background paper was just what I needed- a sheet from the 7 Dots Studio "Messy Head" collection. From there I mixed and matched some Prima papers & canvas, as well as some sheets from the Messy Head 6x6 Designer Pad.

For the Graduated Circles piece, I applied a bit of gesso before sprinkling on some Shimmerz Enamelz in Fake Bake. This is my first time using this stuff (Leslie did a special order for us over at C'est Magnifique) and I really love it. 

My title piece is from the All Natural Set. Just a little bit of gesso was all it needed! 


And aren't these new Berry Stems just adorable? I love them :) Perfect for sticking into your clusters! And with 6 in a package, they are easy to stretch out over a few different projects.

Products Used:

Graduated Circles

All Natural Set

Berry Stems

For my second project, I have a tag:

"Friends" Tag
Do you ever start out on a project and decide Hey, I'm going to do something different. And then you immediately say Oh, now WHY did I do that?! That is what happened here. I thought it would be a good idea to use some red...with black...and gold...which is just not my go-to color combo. At first, I was not happy with that decision. Immediately I wanted to toss it and go for a color scheme more inside my comfort zone. But I stuck to it and I'm okay with it now ;)

I again used some Enamelz here because I was really having fun with the stuff. I've also used a transparency from the Webster's Pages "Royal Christmas" collection to back my Ironwork Accents chipboard piece. It made adding my title SO easy :)

I think I mentioned at one time my Prima Corine stash. Well, I've started using them again...I'm learning to let go ;). I don't often use red, so this red Corine came in handy! And isn't that Prima flair button just perfect? I love it. It's from the new Everyday Vintage collection.

Products Used:

Ironwork Accents

That completes my post today! I just wanted to thank those of you who always take the time to come over and see what I've been up to. I cannot even express to you HOW busy I've been- between the kids, the garden, the berries, the canning, the bear baiting, the extra jobs I've taken in the past two weeks to cover for a friend, the preparing for my first Kindergartener to go to school, preparing for my daughter's 2nd birthday, the HEAT...I could go on and on....I'm just a bit swamped and haven't had much time at all to return the kindness I've been shown by those of you who have left the nicest comments for me...seriously, SERIOUSLY...THANK you! I truly enjoy reading each and every one.

Bless you all :) Take care...

Wednesday, July 31, 2013

7 Dots Studio *NEW* Messy Head Collection! {Feature @ PaperHaus}

Good morning yet again, my scrappy friends!
{Are you sick of me yet?? Ha!}

The flow of projects continues today with a canvas that I created using the *NEW* Messy Head collection from 7 Dots Studio

7 Dots is being featured this week over at PaperHaus, and this is what I created for the event!

"Doll"
The perfectly pretty pastels in this collection are simply heavenly! This completely cute photo of my little girl was taken by my sister when she was at my house visiting last, and I was so happy to find the perfect place to scrap it :) Pinks and purples were just right for her :)

I've mixed in some Prima pretties too! Like the Ingvild Bolme resin frame (dabbed up with some Shabby Tote chalk ink) and deer, as well as nice dose of gorgeous flowers...

I've softened up all of the papers with some gesso, and then accented with various chalk inks.

I've snuck in some of the brand new Bark Pieces from Prima- these hearts are my favorites!

Products Used:

Messy Head: 6x6 Designer Pad

If you'd like to see plenty of other 7 Dots Studio-inspired project, head over to the PaperHaus Magazine blog HERE- all week long!

Thanks for coming over :)

Friday, June 14, 2013

"Smile Big" {PaperHaus} Tutorial

Hello there, friends :)! 

I'm back again today with a new project, this time for PaperHaus. I decided to create a tutorial on layering...everything. 
Literally. 

Check it out :)

"Smile Big"
Ahh...my adorable little guy...suffering through endless picture taking by mommy :). Poor thing- all he wanted to do was ride his bike- but who could resist the evening lighting? Not me! He was patient...but smiling he was not! Ha!

Here's my tutorial:


I hope you enjoyed this little step-by-step :) 
I often hear people say that they just don't know "how" to layer...so I tried to break it down as easily as I could. Thanks so much for checking it out.

See ya soon~! 
Take care,